Official Guide · iPhone / iPad
Shadowrocket User Guide
First import your existing connection details, then choose Global Routing, turn on the switch, and verify real-world access. This guide follows the initial setup sequence; skip completed steps using the table of contents. On iPhone and iPad, look for the English labels shown here. The current app layout may vary.
Once you have your connection details, choose the right input method: a subscription link retrieves a set of connection entries, while individual server details let you add one connection manually. You don't need to enter both. A subscription is not a configuration file: it provides server details, while a configuration file determines how requests are routed. For your first setup, get one connection working and verified before tackling complex rules.
Home → Add Server
Step 1: Add a Server or Import a Subscribe Link
Choose one import method based on the details you have. After saving, confirm the entry appears in Home before choosing a routing mode.
Have Individual Server Details? Fill In Add Server
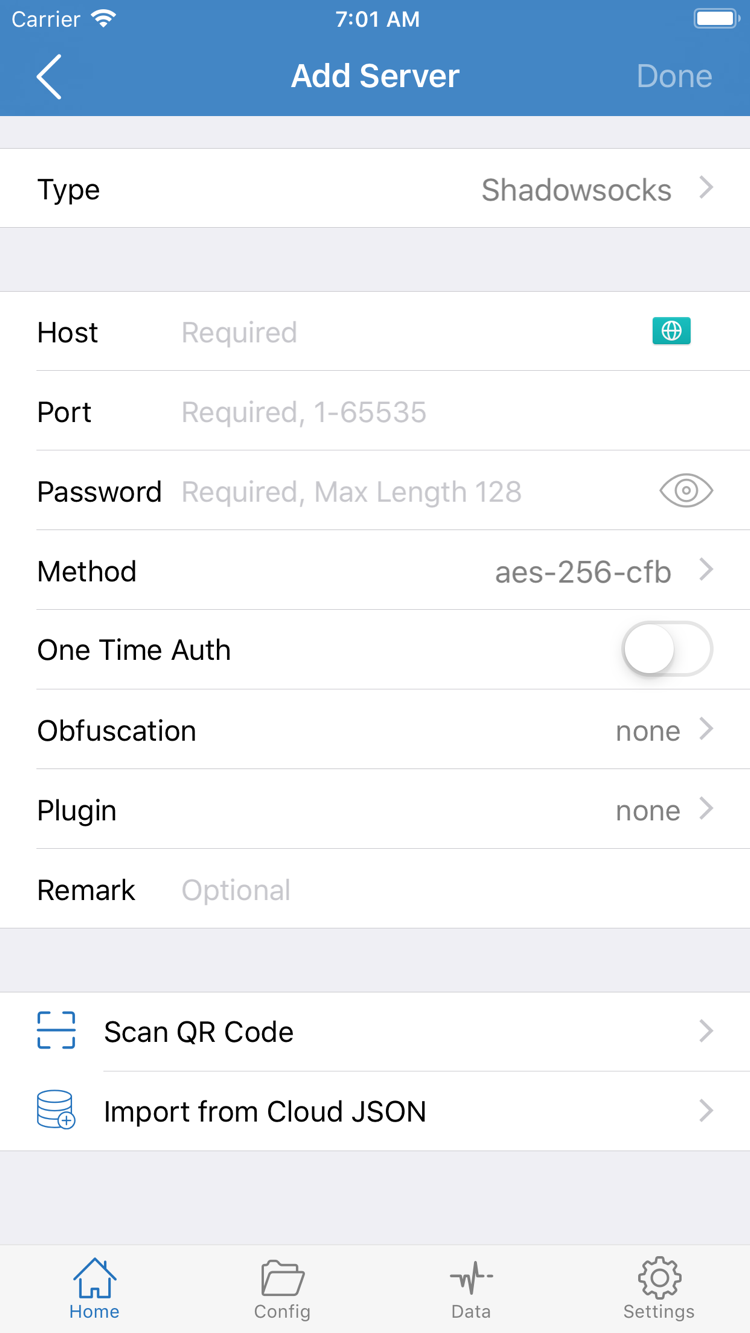
Open Home and tap Add Server near the SERVER section. On the edit screen, tap Type and choose the protocol specified in your server details. The available fields change depending on the selected Type. The Host, Port, Password, and Method shown in the screenshot are one possible set of fields, not a requirement for every protocol.
Enter the existing server address in Host and its port in Port, then fill in the authentication and encryption fields as specified. Host is usually a domain name or IP address; don't add a web page path. Preserve the capitalization and symbols in Password, and check for spaces at either end after pasting. Method must match your server details—don't choose a different value just to save the form. Match any additional authentication or transport settings to the details you have. If anything is missing, check with your service provider.
If your existing details are provided as a QR code, you can use Scan QR Code. After scanning, check that Type, Host, and Port match the original details, then save. Import from Cloud JSON is for a specific import format; don't paste an ordinary subscription link there. If the content isn't recognized, check its format instead of repeatedly switching protocols.
Have Your Own Subscription Link? Choose Subscribe
Open Add Server, tap Type, and choose Subscribe. Paste your full subscription link into the URL field. Subscription URLs may include query parameters that are part of the address; don't remove them, omit anything after a line break, or trim the final characters when copying. Add a label you can recognize, save, then return to Home and check whether the subscription was fetched and server entries appeared.
If saving creates a subscription group but no selectable servers appear, check whether the group needs to be updated and whether an error is shown. Updating a subscription requires network access to its URL, and the URL must still be valid. Don't share a subscription link publicly like an ordinary web address; it may contain access credentials. For expired links, authentication, and response format issues, see Troubleshooting.
After saving, select the server you want to use under SERVER in Home and confirm that it is marked as selected. A successful addition only means the details were saved in the app; it doesn't confirm that the server can connect. Next, choose how requests should be handled, then verify the result with a test and real-world access.
Global Routing · Config / Proxy / Direct
Step 2: Choose a Global Routing Mode
Config, Proxy, and Direct determine whether requests follow rules, use a proxy route, or connect directly.
Return to Home and tap Global Routing to view the options. This changes how requests are handled; it doesn't change how you imported connection details or fix server authentication. For your first setup, understand what each option does before turning on the connection switch. Don't change the mode, server, and DNS all at once just because a page won't load.
Config: Route Requests by the Current Rules
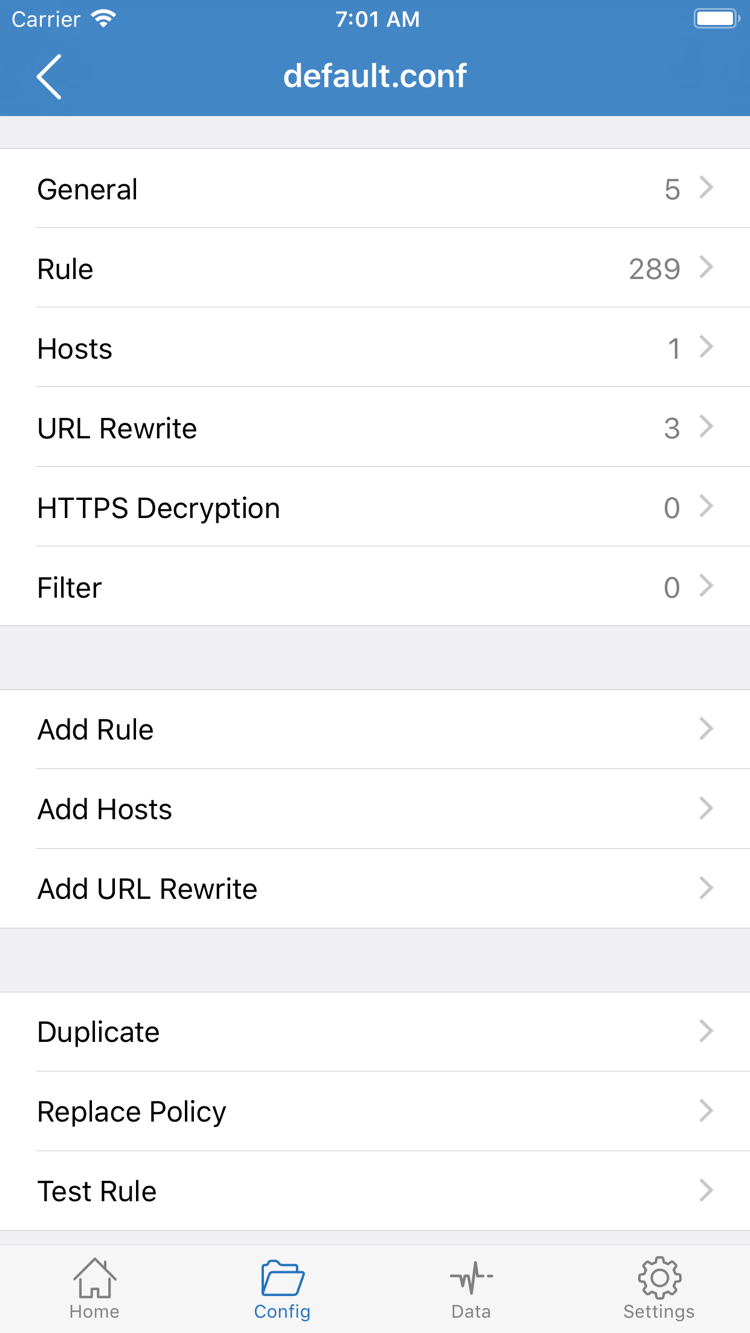
With Config selected, requests are handled according to the rules in the active configuration file. Open the Config page and confirm which configuration is actually active—not just that a file appears in the list. Open it and check the Rule content and the policies it references. The configuration editor's General, Rule, Hosts, URL Rewrite, and HTTPS Decryption sections each serve a different purpose; you don't need to edit them all for an initial connection.
Rules are generally evaluated in order, and a matching request uses the corresponding policy. This snippet only illustrates domain suffix matching and a fallback rule; it's not a complete configuration for your network and should not replace your current file. example.com is a sample domain. Whether a specific destination uses a proxy depends on your rules and needs.
[Rule]
DOMAIN-SUFFIX,example.com,PROXY
FINAL,DIRECT
The first rule matches example.com and its subdomains, using PROXY. Requests that don't match an earlier rule reach FINAL and use DIRECT. This explains why the connection can be on while some requests still connect directly. To change rules, use Add Rule or edit an existing entry. Keep the original configuration and verify changes one rule at a time. See the Advanced guide for detailed steps.
Proxy and Direct: Compare Connection Routes
Proxy is useful for a temporary check of the selected proxy route, though other related settings may still affect how requests are handled. Direct uses a direct connection and doesn't test the remote proxy server. If a destination fails with Config but works with Proxy, first check which rule it matched. If the proxy route itself fails, revisit the server details and test steps instead of adding more routing rules.
After choosing a mode, return to Home and confirm that Global Routing shows the expected selection. For everyday rule-based routing, restore Config after testing and check which configuration file is active. With the server and mode confirmed, continue to connection authorization.
Home · Not Connected
Step 3: Turn On the Switch and Complete System Authorization
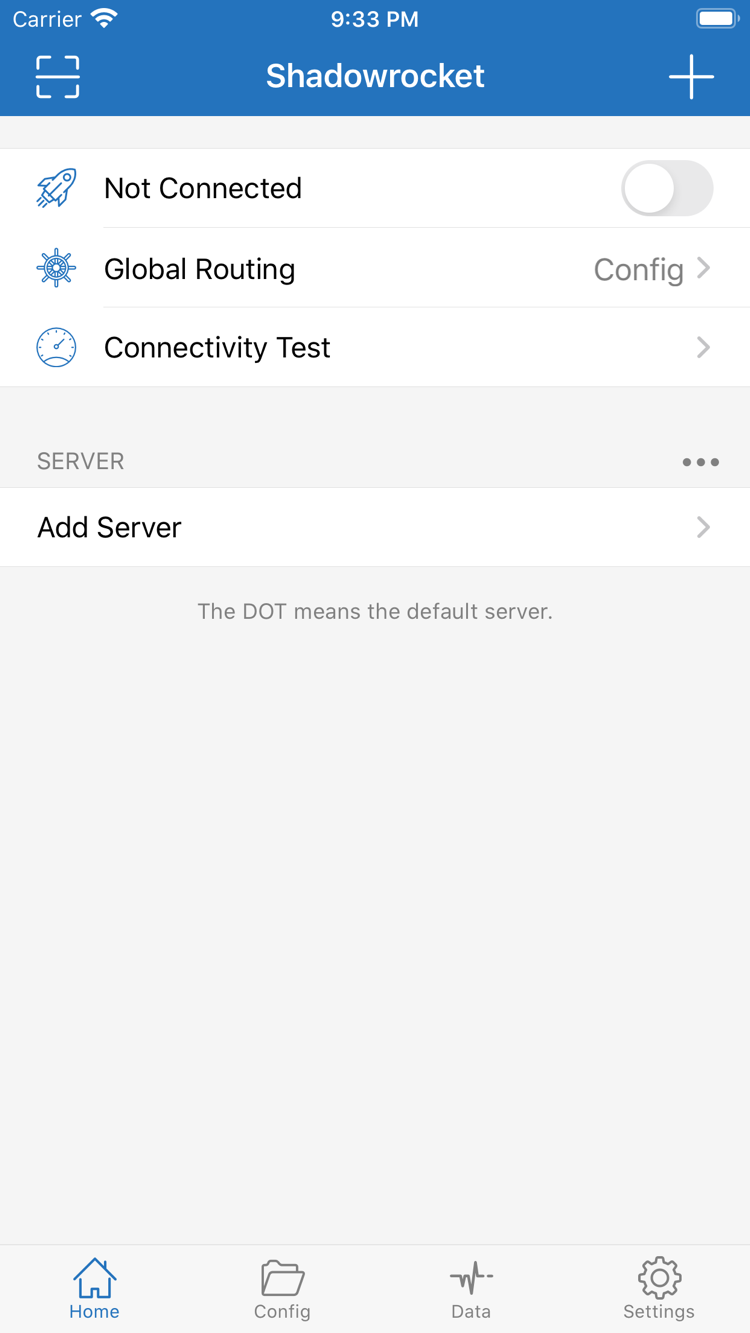
Confirm the selected server and Global Routing mode, then turn on the connection switch at the top of Home.
Check three things in Home: a selectable entry appears under SERVER, the intended server is selected, and Global Routing shows the expected mode. The Not Connected label at the top of the screenshot means the app was not connected at that time. Tap the adjacent switch to connect; there's no need to reopen Add Server and save the details again.
The first time you connect, the system may ask permission to let Shadowrocket add a VPN configuration. This authorization is required for the app to use the system network extension. Check the app name in the prompt, allow it as instructed, and complete any verification required by your device. If you cancel, the switch won't establish a connection; return to the app and try again, completing the authorization.
After authorizing, return to Home and check that the status and switch at the top remain on. A connected status means the app's local connection has started; it doesn't verify every remote server, DNS request, or destination page. Rules still determine whether requests use a proxy or DIRECT, so check connection status and real-world access separately.
If the switch turns off immediately after you turn it on, first check for a system prompt or an app error. Don't rapidly toggle the switch or delete all your configurations right away. Confirm that authorization was completed, then check whether another VPN configuration is in use or device management restrictions apply. Ask the relevant administrator about restrictions on a managed device. Keep your existing details and use the troubleshooting steps below to locate the failure.
The available space and layout may differ on iPad, but look for Home, SERVER, and Global Routing. When setting up another device, check its connection authorization and active configuration separately. Having the app installed or seeing a purchase in your history doesn't mean server details or the selected server have synced.
Once the connection stays on, switch to your browser to verify access. Keep the network unchanged during the test; switching from Wi-Fi to cellular at the same time makes it hard to tell whether the result came from a configuration change or a network change. After one test, check other network environments separately.
Connectivity Test → Real-World Access → Request Route
Step 4: Verify the Connection and Routing Rules
Check two things separately: whether the selected server responds to a test, and whether the destination you need works over the expected route. Open Connectivity Test in Home and check the result for the selected server. The result only reflects the stage checked by the current test method; it doesn't guarantee that every website is accessible, all protocols are working, or that you will get a particular transfer speed.
Once the test returns a result, reopen the page you originally wanted to access in your browser. Choose a destination where you can clearly reproduce the issue, rather than opening many pages at once. Note whether DNS resolution completes, loading begins, or the request stalls at a particular point. Refresh once and wait a reasonable amount of time. Repeated rapid refreshes create more connections without helping identify the cause.
To check routing, review the connection records or logs available in the app and verify the destination domain, matching rule, and policy used. Under Config, a destination using DIRECT may be the expected result. A VPN status indicator alone doesn't mean all traffic goes through a proxy. Traffic changes in Data can provide context, but an increase in usage doesn't prove that a particular rule matched.
Choose the Next Step Based on the Result
- Both the test and real-world access succeed: Keep the current server and configuration. If you temporarily used Proxy, switch back to Config and test the same destination again.
- The test fails, but some pages work: Check the test method and the route used by the page. The page may use DIRECT, or the test may target something different.
- The test succeeds, but a page won't load: Check that page's DNS, rule policy, and connection records. Don't assume the server details are all correct.
- Results change after switching networks: Record what happens on each network, then check network restrictions and differences in name resolution. Don't assume every failure is caused by the subscription.
For a comparison, change one thing at a time. For example, temporarily switch from Config to Proxy without changing anything else, then try the same page. If the result changes, you have a basis for investigating the rules. Restore your usual mode after testing. For persistent timeouts, resolution failures, or performance issues, find the relevant symptom in Troubleshooting. You don't need to change every advanced setting during initial setup.
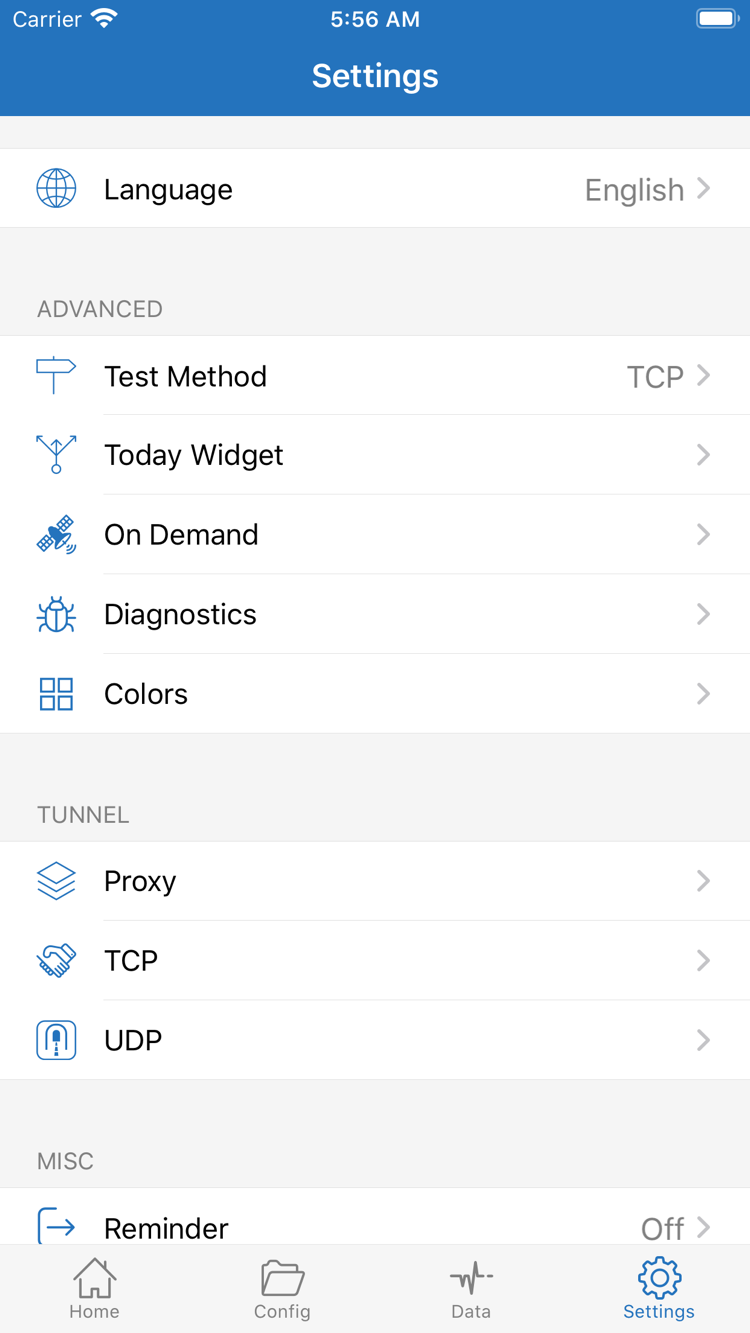
Settings · Test Method / On Demand / Diagnostics
Step 5: Troubleshoot Settings Based on the Failure
First identify whether the failure occurred during import, testing, authorization, or real-world access. Keep the original configuration and change one relevant setting at a time.
No Server Appears After Import: Check the Source Details
Return to Add Server and confirm that you chose Subscribe for a subscription instead of entering the link as a regular server's Host. Check that the link is complete and still valid, and look for authentication or format errors during the update. For a manual entry, compare Type, Host, Port, and authentication fields with your source details. Saving doesn't confirm that the parameters meet the server's requirements. Ask your service provider about missing details; don't guess based on a screenshot.
Connectivity Test Times Out: Separate the Test from the Connection
Open Settings and check Test Method to see how the current test works. Different methods check different stages, and test results shouldn't be treated as a measure of browsing speed. First verify the selected server and port, then check whether your current network can reach the server. To compare with another existing entry of your own, change only the server and keep the mode and network unchanged. This helps determine whether the issue is limited to one entry.
Connection Won't Stay On or Changes Automatically: Check On Demand
If the connection starts or stops as network conditions change, check whether On Demand is enabled and review its existing conditions. On-demand connection is triggered by conditions; it isn't a speed boost. During initial troubleshooting, note its current state and temporarily turn it off to test a manual connection. Once you identify the cause, restore any conditions you need. Today Widget is a shortcut setting, not a way to determine whether a server is working.
Test Succeeds but a Page Fails: Check Diagnostic Details
Use Diagnostics and the logs available in the app to identify where the request fails. Focus on the difference between DNS resolution, the remote connection, and the rule policy. If only one domain fails, check its records first instead of changing all DNS settings. Proxy, TCP, and UDP in Settings affect different connection behavior. Don't adjust them all by guesswork during initial troubleshooting; check what each setting does and keep a note of its original value before changing it.
If you encounter issues after an update, changes in battery use, or an iPad-specific problem, first note the network, Global Routing mode, selected server, and steps to reproduce it. Don't make reinstalling your first step; save any necessary details and check the configuration and authorization to avoid losing useful troubleshooting information. Check the App Store listing for updates and system requirements; don't infer the app version from a screenshot's appearance.
After following these steps, you should be able to identify where the problem occurs: the import didn't create an entry, the server test failed, system authorization wasn't completed, or an actual request failed under the current rules. Use that finding to read Troubleshooting, then consult the Advanced Troubleshooting Guide for deeper checks. Before everyday use, confirm that the connection status, selected server, and Config file in Home are as expected.